Showing posts with label Mexican Desserts. Show all posts

Monday, March 19, 2012

Capirotada (Mexican Bread Pudding)

There are TONS of recipes for making Capirotada, every family, household, or individual seems to have a different style of making it, different ingredients they add, etc. BUT the element I've noticed present in ALL of them is SUGAR, CINNAMON, CLOVES, and sometype of cheese and of course hard toasted bread that sucks up the syrup and becomes tender, the rest can vary greatly. It is popular around Lent for Catholic Mexicans, and well whoever grew up with this dish.

This is my grandmother's recipe (from my mother's side her name is Leonor) her and her family are from Guadalajara (Jalisco), Mexico, and of Spanish descent. This recipe is my grandmother's grandmother's recipe so it's probably been in my family since 1800's, over time the addition of condensed milk is my mother's idea, and she uses it to replace part of the sugar in the recipe and for extra richness, my grandmother uses evaporated milk in place of the heavy cream because it is almost always stocked in our pantry, but I'm sure in the old day's it was heavy cream :)

I noticed a lot of people use a simple syrup with just piloncillo, water, cinnamon and cloves, it's a dark watery syrup, that the bread is soaked in, but my families way of making it we always add whole milk, and cream and such making it more decadent and giving it more body... we layer it with a fresh tender cows milk cheese called "Queso Fresco" the variety we use is very tender for this dish, it also includes in between the layers ripe plantains, pecans, and raisins.

For some using cheese in a dessert may sound weird, but it's really common, Cubans pair Gouda or other types of white cheeses with sweet fruit compotes, marmalade's, and fruit pastes, in Spain a fresh cheese called "mato" is paired with honey and walnuts and called "mato y mel", or I've seen french cheese platters with raisin type bread, fresh fruit, etc. so it's not really an odd concept, at least not to me and many others. HOWEVER ...

and it is a BIG HOWEVER there's one thing that even left me saying what the &*#$ when I was learning to make this... my grandmother adds a piece of onion, and fresh tomato that she later strains out pf the syrup, I mean well I know they both have some sugars/ sweet components to them, but it is odd, trust me though they don't over power the dish AT ALL, they add a very subtle flavor but it doesn't taste like tomato or onion just adds a special note, I know it sounds weird but give it a try, and if it really freaks you out, I'm sure you can leave it out and still get a delicious result. I really thought my grandma had lost her bonkers but I googled around and found some recipes include the onion and tomato in their syrup and it works.

Main Ingredients:

-1 1/2 lbs french bread or bolillo bread or "birote"
-about 1 cup pecans (more or less as needed you'll see later)
-2 large plantains (frying bananas)
-raisins about 1 cup (depends how much you want)
-1/2 lb. fresh cows milk cheese/ "Queso Fresco" (a type of fresh soft cows milk cheese)
-butter (to grease baking dish)
-corn tortillas (as needed to line up baking dish or vessel)

Ingredients for syrup:
-1 liter/ 4 cups whole milk
-2 14 oz. cans of evaporated milk or heavy cream (about 4 cups if using heavy cream)
-2 14 oz cans of water (use the evaporated milk to measure it out)
-1 can of sweetened condensed milk (optional replace it with 1 large cone of piloncillo or 1 cup dark brown sugar if you don't have it or want to use it)
-2 large cones of "Piloncillo" (cones of unrefined solid cane sugar, you can use dark brown sugar if you don't have it, the equivalent of 2 cups to replace it)
-3 cinnamon sticks
-4 cloves
-1/2 onion chopped into big chunks
-1 large tomato cut into chunks

Directions:
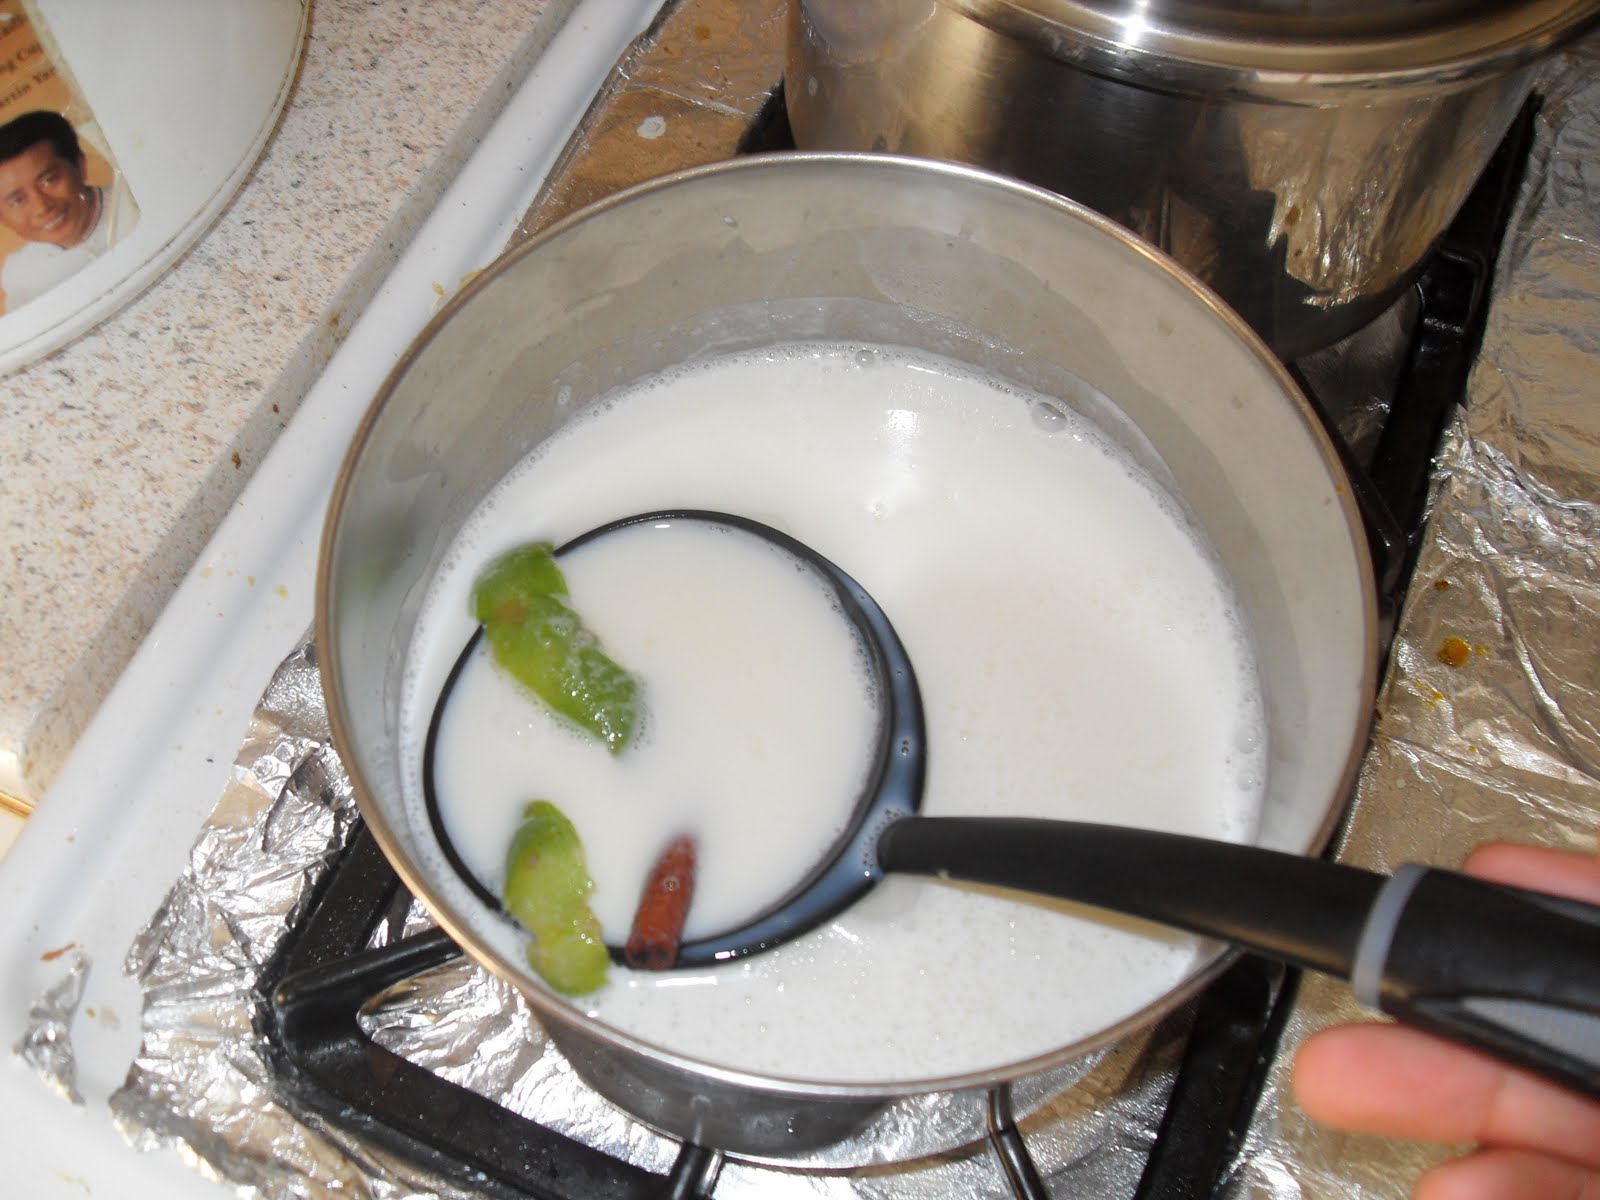
(1) Mix all syrup ingredients (milk, evaporated milk, water, 1/2 onion, tomato, cinnamon, cloves, and piloncillo along with condensed milk if using) in a large pot, stir occasionally and bring to a boil (takes awhile to get there) , lower heat to low and allow to simmer uncovered for 5- 10 minutes, turn off heat.

(2) Meanwhile, get several deep- baking dishes, we used 1 large one, one medium one, and 1 small one (we just kept layering and making until we ran out of syrup, my grandmother didn't really measure it was all approximated). Get the baking dishes you are using, and brush heavily all over with melted butter (put ALOT!) and line it with corn tortillas, including the edges (you'll have to cut some in half) that way line the sides with it.
(3) Now that you have your dishes/ mold/ vessel ready (greased and with a layer of corn tortillas) add 1 layer of the toasted hard bread, grab the syrup mixture and ladel it with a strainer over the bread slices, so you don't get any of the solids in the syrup, ladel it little by little over bread NOT all of it, just moisten the bread slightly.

(4) Springle with raisins, pecans, fresh cheese crumbled, and plantain slices. Add another layer of bread and ladel some of the syrup over it with a st, and sprinkle again with raisins, pecans, fresh cheese, plantain slices, and finally add the the other layer and sprinkle with the raisins, fresh cheese, plantain slices, etc. ladel syrup again

Basically you are making layers, the amount of layers you have depends on how deep your vessel/ dish is.
(5) When your done with all your layers, and stuff, the remaining syrup ladel it over your bread pudding dishes MAKING sure to strain it (you don't want to bite into a clove, or piece of cinnamon or worse a tomato or onion... lol.)

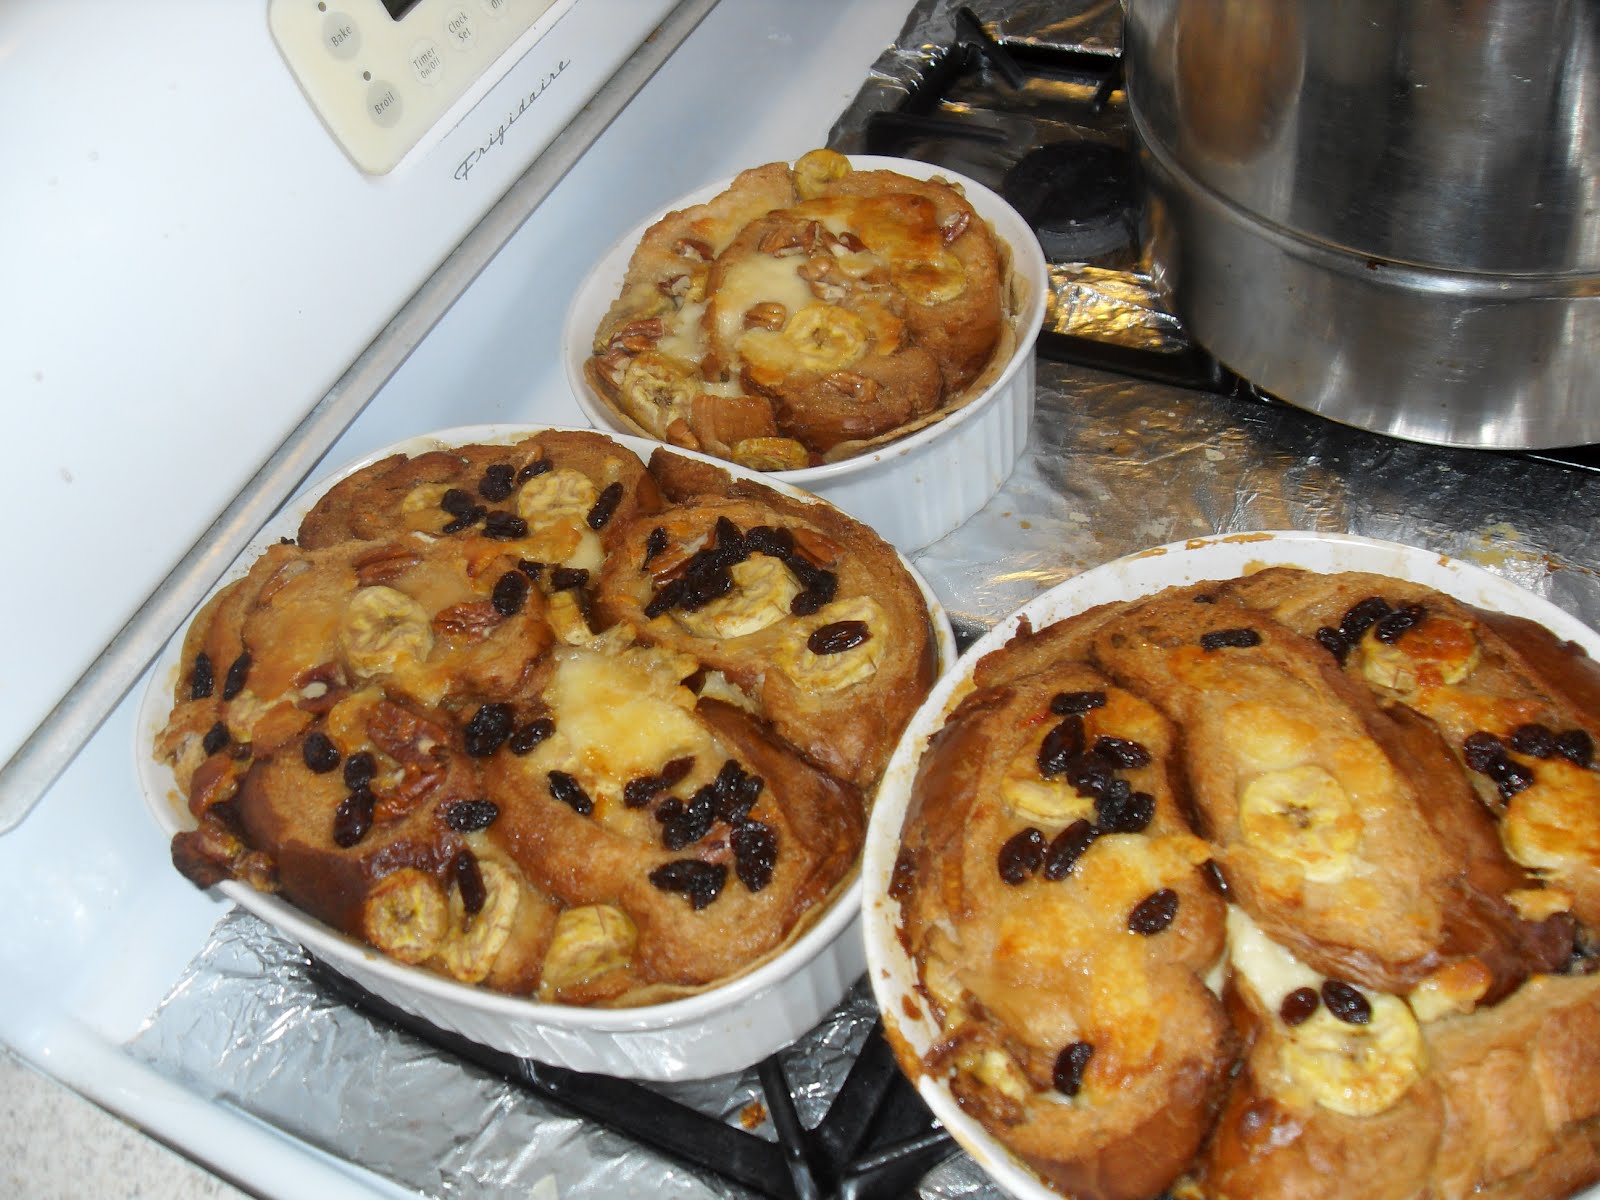
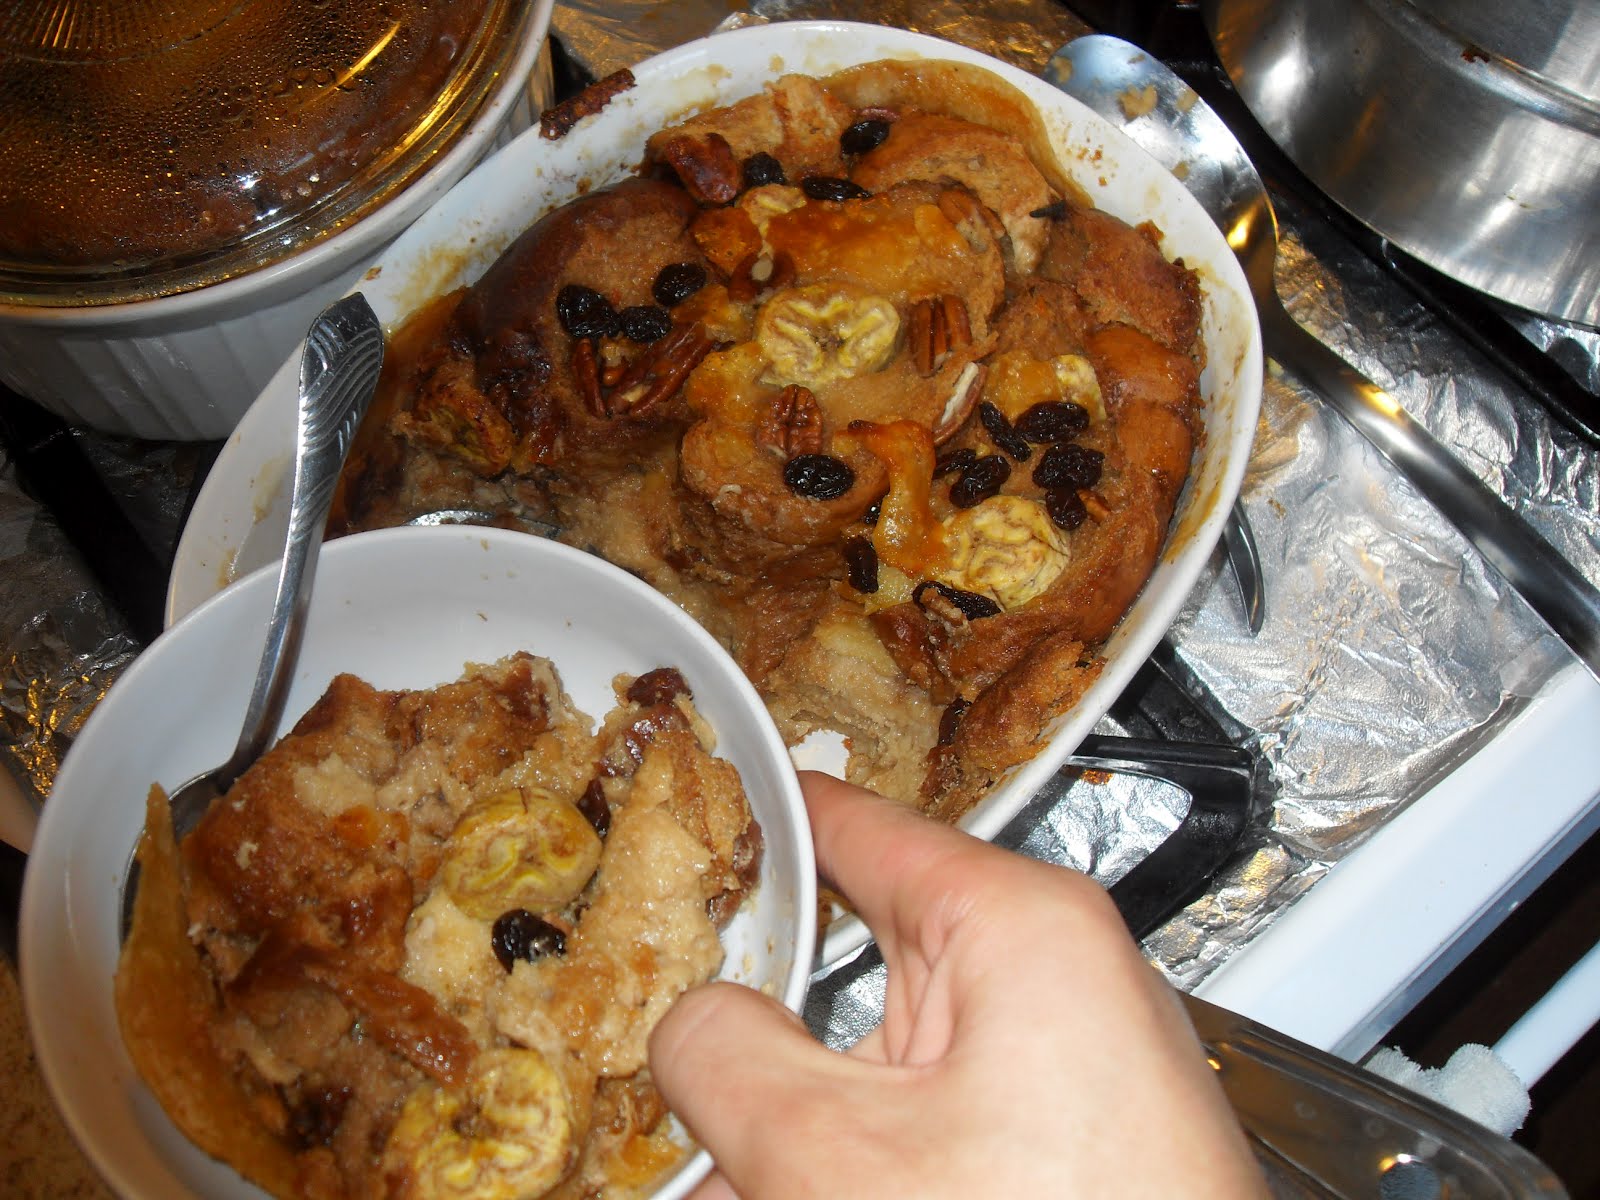
(6) Bake covered in an oven for 40 minutes, at 350 degrees, then uncover and allow to bake an additional 10 minutes.
Turn off heat, remove and allow to cool down.
PLEASE PLEASE NOTE:
(1) The bread we used was already hard, it was already toasted, fried, etc. during this time of the year you find it in any of the Mexican/ Latin groceries stores here in LA/ Southern California. They sell 1 lbs. bags, if you don't live in an area where it is readily available, simply buy a large loaf of good french bread, slice it into thick pieces, and let it stay out over night so it turns hard and stale, then toast in a pan by frying all sides with some oil. or rub it with butter and bake it. It makes for more work though...

(2) This can be done on stove top, use a deep thick pot, make your layers, cover over high heat, then lower heat to very low and leave it 20- 25 minutes, then remove from heat and let it rest. This is usually done in a clay pot. I used an oven. Originally my grandma said her family would make it in large clay pots over a fire outdoors, with a large heavy comal (type of griddle) over it with a wood fire happening on it it would heat the top and bottom. I have no clue how to do it like that though...

(3) This makes a pretty large amount feel free to cut the recipe in 1/2, it's not really a recipe that needs measuring to be honest, like you taste the syrup if you want it sweeter well you add more sugar, etc. the raisins, pecans, cheese, plantain you add as much or as little as you like, if you don't like some of them well omit it.

Wednesday, November 9, 2011

Flan de Leche (Caramel Milk Custard)

This is a different style of making the famous "Flan" the caramel custard of the Spanish speaking world (I think every spanish speaking country has some version of flan).

Now growing up I ate A LOT of flan (different flavors and textures) there's generally two types. Those that are very rich, creamy and dense, similar to a cheesecake texture I would say. Those are typically made with condensed milk, evaporated milk, and eggs sometimes with the addition of cream cheese for extra richness. Usually always full proof.

However today I go into the pantry having flan on my mind... and GASP I had NO EVAPORATED MILK!!! I did have a can of condensed though... and I thought to myself, "Eh if I don't have both cans I'm not making it... well now is a perfect time to experiment and make the one's that are made from scratch using just cow's milk" and so I did :D I've had the one's made with just milk before, and the difference is these are in my opinion a whole different type of flan on their own... NOT IN A BAD WAY... just depends your likes. The one's that are made with just milk have a more "jello" like texture, they are generally lighter in texture, and slightly more eggy (more eggs are used to stabilize)... umm I would describe it as sweet milk jello LOL. my household loves this type of flan too though, it had been forever since I had (literally forever last time I had this type of flan was when I lived in LA back in mid 90's when I was still in elementary school)

So if your interested in a different type of flan give this one a go-go :)

Ingredients for custard:
-4 cups milk
-1 small lime peel (optional)
-1 large or 2 tiny sticks of cinnamon (optional)
-1 cup sugar (you can add wayyyyy more sugar if you'd like LOL. but my mom doesn't like it too sweet)
-1 tsp. vanilla extract
-8 whole eggs

For the caramel:
-1/2 cup sugar
-1/4 cup water

Directions:
(1) Heat milk in a deep sauce-pan, add sugar, together with lime peel and cinnamon sticks (optional I like the hint they add, it's a typical combination in cuban or spanish cuisine to fuse cinnamon and citrus flavors) but it will be just as good with vanilla as flavoring.
(2) Allow to simmer about 10 minutes to really infuse, then cool, also the purpose of heating the milk isn't only to infuse it with other flavors, it's also done to make the flan more smooth, so the sugar becomes smooth. Remove lime peel, and cinnamon when cooled enough to handle

(3) Now beat 8 eggs with vanilla extract,
and slowly stream in milk mixture until fully incorporated
(4) Set aside mixture, now the caramel part, I personally make the caramel using water and let it reduce out, this let's me do it quick (using super high heat without worrying about burning or clumping while stirring vigorously, the water kinda stabalizes it, won't let it burn right away if you pay attention to it)
Once it starts becoming a dark amber color, pour the caramel into a mold carefully grabbing the edges of the vessel your using coat it, it will seem like it's too much caramel sometimes but keep rotating and spreading the caramel on the vessel until it hardens and coats everything... isn't beautiful :D
(5) Now strain the milk mixture in
(6) Cover it with aluminum foil (or leave it un-covered your choice I just think it's better covered), and place it in a water bath (that just means in another container with some water) in the oven at 350 degrees
(7) Should be done anywhere from 1-2 hours just check it after one hour, if it's too jiggly and looks like it's liquidy too much still then leave it longer, if not then take it out, you can test it with a knife, if the knife comes out clean your good :)
(8) Allow to cool completely, (ideally in the fridge, for several hours and or over night to allow it to set well) however I was in a hurry so I put it in a ice water bath hehe, and then vigorously flipped it our (by putting a plate on the vessel then flipping it out), thus it broke, also when done with just milk the custard is more sensetive and breaks easily
Not my prettiest flan :-/
If interested in other Flan recipes check out:
(1) Flan de Queso (Cheese Flan the riches flan you'll ever HAVE!)

(2) Flan de Coco (rich coconut flan, made using thick coconut milk)

(3) Eggnog Flan (this one will get you in the Christmas mood ha ha)

(4) Pastel Impossible (Moist chocolate cake layered with flan)

Friday, December 31, 2010

Eggnog Flan

As I was flipping through one of my mother's "Foodnetwork" magazines (Vol. 3 number 10) I bumped into a recipe for "Eggnog Flan" on page 102. There was a whole section of cooking with eggnog (because people tend to have leftover eggnog from holidays or it sits in the fridge because "it's too fattening" for the weight conscience hehe... i'm one of them, will have a small glass then ignore it forever)

Anyways, the recipe called for only eggs, the eggnog, and caramelized mold. I started preping my flan, and then tasted the batter I was like "it's kinda bland" so I added 1 teaspoon vanilla extract, and then added some extra-sugar to taste it needed it, to mask the "egginess?". I made the caramel the way I always make it. And saw the instructions for the baking and was like "uummm I'll just do it my way 325 is too low I've made flan probably more times that the woman who wrote this has in her lifetime... n' I don't do it that way..." so pretty much I made the recipe my way and my own lolz.

The results... a rich, creamy, and dense eggnog custard, with hints of cinnamon, and exploding with that strong nutmeg fragrance and taste common in eggnog. Coated in the sinful caramel syrup that had adopted the taste of the eggnog. I will be making this again, not now, but next year ha ha. (I love flan, but my favorite is a version made with cream cheese which is what I almost always make, this adds a nice change or variety :)

Main Ingredients:

-5 large eggs
-3 heaping tablespoonfuls sugar
-4 cups eggnog (store bought, it can be spiked with rum, brandy, whiskey whatever you'd like that's optional, for my Mexican readers you can use "Rompope" and for my Cuban reader's you can use leftover "Creme de Vie" as an alternative)
-1 tsp. vanilla extract
-1/2 tsp. cinnamon powder (optional)
For the caramel:
-1/2 cup sugar
-3 tablespoons water

(1) Pre-heat oven to 350 degrees with a oven pan/ mold bigger than the mold/ pan your gonna use for your flan. Add water enough to fill 1/2 way. Forget about it while making your flan.
(2) First thing is first, in a sauce pan put 2 tablespoons water and 1/2 cup sugar. Bring to a boil on high heat, mixing well, stir constantly, keeping an eye on it so it doesn't burn completely.

(3) When it turns into a golden color, pour into a mold, and move around in a motion that will make most of the bottom and surrounding area of the mold get covered with caramel. BE CAREFUL it is VERY HOT, and if you burn yourself with it... good luck... do not let your skin make contact with the caramel. Set aside.

Directions for the rest:
(1) Beat eggs with sugar and vanilla using whisk, until well incorporated, slowly stream in eggnog until everything is very well mixed and incorporated or your second option throw everything in the blender and blend on low then high for about 30 seconds.

(2) Pour into a mold, passing through a strainer (if you have one, but if you have one use it, I believe it get's rid of air bubbles and makes it more smooth). Sprinkle all over with cinnamon powder. Cover the mold tightly with aluminum foil or some type of lid. This is your "flan mold" you can call it with the "flan" inside.

(3) Place the flan mold in a bigger pan that has been heating in the oven with hot water, in the center of the oven. Cook for about 1 1/2 hours covered. This procedure of cooking we call it "baño maria" (in which something is placed in a hot water bath to cook),
uncover after 1 1/2 hrs. and let cook uncovered an additional20- 30 minutes. It should be completely set by now (I cooked this longer than some flans because it just took longer to set since I didn't use real thick condensed milk)

(4) Take out flan, allow to cool down, then let cool in fridge,
when ready to serve invert it onto a plate, and slice and serve, btw the brown specks aren't dirty stuff it's just specs from ground nutmeg that come already in the eggnog, I also cooked my syrup to a light brown as opposed to dark amber so that's why my flan came out real light. Just preference for this one time, I usually make it dark amber though, but I was craving a caramel sauce similar to my grand-aunts which is usually light :)

For some other flan recipes you might like check out the following:
(1) Chocoflan (Flan with a layer of Chocolate Cake)
(2) Flan de Queso (Cream Cheese Flan a mix of Cheese cake and Flan).... this one is my favorite flan...
(3) Flan de Coco (Coconut Flan)

Friday, May 28, 2010

Chocoflan/ Pan Impossible

Chocoflan I believe is a Mexican dessert because I've only heard of it and seen it prepared among the Mexican community. It's basically a chocolate cake with a layer of flan (caramel custard).

The first time I made this was on my stay in one of my aunt "Mari's" house where she introduced me to this wonderful cake which she calls "Pan Imposible" translates to "Impossible Bread". It is usually done in a large bundt pan that has a 12 cup capacity because the regular bundt pans can't fit all the cake batter and flan batter without overflowing.... my aunt is lucky to have a giant bundt pan she received as a gift :(

Any who, usually the solution a lot of people have to this problem is they use a regular bundt cake pan and then make a smaller chocoflan with the leftover batter or throw away the excess, however I for one am not one to waste food. I simply divide the batter evenly in two and use 2 bread loaf pans. You can pretty much use any type of mold/ pan to bake this, just work with what you have, that's what I do.

By the way this cake has become a hit in my home, it's my Tata's favorite dessert lately :D and I baked this for my boyfriend's birthday and it was a hit once again.

Ingredients for cake part:
-1 prepared chocolate cake recipe (I used a devils chocolate food cake mix)
Ingredients for flan:
-1 can condensed milk
-1 can evaporated milk
-5 eggs
-1 teaspoon vanilla extract
-1 cup cream cheese (optional I do add it because I am SINFUL ha ha)
Ingredients for caramel:
-1 cup sugar
-1/4 cup water

Directions:
(1) Preheat oven to 350 degrees Fahrenheit (180 degrees Celsius), get a shallow dish that is oven proof. Any baking dish, cake pan or mold that can fit the pan you are going to use to make the "Chocoflan" and fill it with water about 1/2- 1 inch and put in oven. This is what we call the "water bath" you'll see what I mean later.
(2) Prepare your caramel, get a sauce pan, throw in your sugar and water and bring to a rolling bubble on high heat, stir occasionally whisking with a chopstick (yes this is how I do it and it always works the water acts as a stabilizer and it wont let it burn or clump and it will still thicken and turn into a caramel) when your caramel is done, add it carefully to the cake pans or mold your gonna use and swoosh it around to coat everything. PLEASE BE CAREFUL IT'S HOT!!!! It will harden quickly as well so work fast. Set aside the mold/ pan
(3) Follow the directions on a Store bought box of chocolate cake mix, or make your own from scratch. Add the prepared batter to the mold/ pan that has caramel coating (in my case I had two molds I use and divided the batter evenly)
(4) Prepare the flan batter, in a large blender or bowl with a whisk or blender combine the condensed milk, evaporated milk, eggs, vanilla and the optional cream cheese to a smooth mixture. Pour them evenly over the chocolate cake batter. DO NOT WORRY IF THEY MIX! They will separate during baking.
(5) Cover the cake pan/ mold with aluminum foil and put in carefully into place them on top of the larger pan that has the water in it in the pre-heated oven. Close and allow to cook in the middle rack for about 1 hour to 1 hour and 30 minutes.
(6) When you think it's done, uncover and insert a toothpick or knife if it comes out clean it's done, if not continue to bake covered a little longer, but if done remove, uncover and allow to cool
(7) Once ready to serve loosen edges with a knife, place a plate on top and flip over :) Slice yourself a piece and enjoy. The result will be this delicious moist chocolate cake with a flan layer, most of the chocolate cake will absorb the delicious caramel syrup and be oh so sinful ;)
NOTE (If interested):
*I know it sounds weird, but the flan and the chocolate cake for some reason, I don't know why will never combine they separate, the flan ends up in the bottom of the pan and the chocolate cake on top. I'm guessing sometype of osmosis or something and when you flip it you get this :D

*Some people use a store bought type of Mexican caramel milk syrup made from goats milk or cows milk called "Cajeta" and they will coat the pan with this instead of the caramel sugar syrup I make.

*The easiest way though and guaranteed is using a chocolate cake mix. store bought Cajeta/ caramel sauce or just know how to make a good caramel, and make a flan batter that is rich doesn't need the cream cheese but gives it oomph.

Tuesday, March 16, 2010

Flan de Coco (Coconut Flan)

I make flan quiet often at my house, it is always rich, smooth, and delicious. I wanted to make a coconut flavored flan, and let me tell you, it came out amazing. It was rich, dense, and had a buttery texture, somewhat firm yet melted in your mouth, heavy but light. It's so hard to describe...

It also helps that I am a big fan of coconut and flan so this marriage of caramel custard and coconut really appeal to my sense of taste.

Give it a try I hope you enjoy it as much as I do :)


Ingredients for custard:

-1 can of coconut cream (or thick coconut milk) unsweetened
-1 can sweetened condensed milk
-5 eggs (both whites and yolks)
-1 teaspoon vanilla extract (coconut extract would work great but I didn't have it)

Ingredients for caramel:
-1/2 cup sugar
-2 tablespoons water

Directions:
(1) Pre-heat oven to 350 degrees with a oven pan/ mold bigger than the mold/ pan your gonna use for your flan. Add water enough to fill 1/2 way. Forget about it while making your flan.
(2) First thing is first, in a sauce pan put 2 tablespoons water and 1/2 cup sugar. Bring to a boil on high heat, mixing well, stir constantly, keeping an eye on it so it doesn't burn completely.

(3) When it turns into a golden color, pour into a mold, and move around in a motion that will make most of the bottom and surrounding area of the mold get covered with caramel. BE CAREFUL it is VERY HOT, and if you burn yourself with it... good luck... do not let your skin make contact with the caramel. Set aside.

(4) In a blender (or you can whisk by hand), add the coconut milk or cream (unsweetened), condensed milk, 5 eggs, and vanilla extract. Blend or whisk by hand.

(5) Pour into a mold, passing through a strainer (if you have one, but if you have one use it, I believe it get's rid of air bubbles and makes it more smooth). Cover the mold tightly with aluminum foil or some type of lid. This is your "flan mold" you can call it with the "flan" inside.

(6) Place the flan mold in a bigger pan that has been heating in the oven with hot water, in the center of the oven. Cook for about 1 1/2 hours. This procedure of cooking we call it "baño maria" (in which something is placed in a hot water bath to cook)

(7) Take out flan, allow to cool down, then let cool in fridge, when ready to serve invert it onto a plate, and slice and serve :)
I know the below picture didn't come out so well but I wanted to put it to show you guys how smooth it came out, with no air bubbles or anything :)
PLEASE NOTE:

The coconut milk and or cream that I buy at stores is THICK and unsweetened. It is the first press when squeezing the milk out of the coconut. (which is made by finely grated a mature brown coconut, adding hot water to it, swishing it, and squeezing it through a strainer. This first press is very thick and rich, the second press is more watery and the presses after that even more so). I know this because my Filipino friend and her mother (Shantall and Herminia) occasionally make coconut milk for Suman (sticky coconut rice and ginger wrapped in banana leaves)

The brands I use are Chaokoh, Mae Ploy. The way you know if a coconut milk is thick is look at the fat content, the higher the thicker.

I know most Hispanic stores carry more watered down coconut milks like "GOYA" brand, which I use and prefer for some rice dishes sometimes. I usually buy coconut milk at Asian stores like "99 Ranch Market", "Seafood City", "Bangluck Market", etc. but for this flan I use a thick rich coconut cream (which is the rich fatty top that rises when you squeeze coconut milk and let it rest.) and or just thick coconut milk. I do not know how this flan will come out if you use a thinner one but it should work fine, I hope you guys enjoy it :)

P.S.
If you wanna read up a little on the back round of flan/ cultural aspect check out my first post I made on "Flan" type desserts, my "Flan de Queso" (cream cheese flan):

http://nathanscomida.blogspot.com/2008/09/flan-de-queso-cheese-flan.html

Also some tips I want you guys to know that you don't need any special equipment to use flan, you can use ANY mold or pan you have that you like or whatever is on hand, heck I've made flan in loaf pans before, the important thing when cooking a flan is technique. As long as you coat something with the caramel, cover it tightly and bake it in a water bath you will get good results and of course the recipe is important :) it has to be rich and dense enough to hold it's shape :) another tip is sometimes (rarely) and this happened to me today, when I inverted my flan it wouldn't un-stick (I know this isn't a word but you guys get it), so I quickly put hot water in my sink, and gently dipped the bottom of my mold to loosen the caramel, took out, wiped then inverted it. You can make flan in individual ramekins too or oven proof dishes.

Another tip I want to add, I know the sauce pan where you make the caramel, you always have some caramel left that sticks to the sauce pan, what I do to clean it is I add water and bring it to a boil and cover it for awhile, the steam will loosen the caramel and any caramel will dilute into the water, then you can just pour out the hot water and wash as you normally would.

Lastly (yes another tip) if you are short on time and need to serve it immediately after cooking, put in in several ice water baths in your sink, I put water in my sink with lots of ice cubes, and put the flan in there, when all the ice melts I drain the water then make another ice bath until it cools well or at least to room temp. then invert it.

Sunday, March 14, 2010

Tamales de Piña (Pineapple Tamales)

These are basically pineapple flavored corn cakes dotted with pineapples wrapped in corn husk and steamed.

They can be eaten as dessert (though very filling), or breakfast with a cup of milk or hot coffee, or snack. It's up to you :)

I think it is best served with some Champurrado (Mexican Cinnamon Chocolate Drink)

Ingredients:

-5 lbs. pineapple tamale dough/ masa de piña preparada (store bought prepared)
-1 can 8 oz. pineapple cut into small chunks, drained
-1 8 oz. packet "Hojas de Tamal Encochadas" (dried corn husk leaves)
Directions:
(1) Soak the dried corn husk leaves 30- 60 minutes in cold water or room temperature water. Then remove and set aside
(2) Mix the pineapple dough well with the drained pineapple chunks/ pieces, set aside.
(3) Get a corn husk, put some masa on it, on the upper part like this. (sometimes some of the leaves may be too small so you may have to use two leaves

(4) Fold it so the two corners with masa stick, then tuck one side in

(5) Then fold the end upwards
(6) Set aside
(7) Get a deep enough pot, and line is with corn husk. (lol. I got this picture from my other tamale post, sorry I had just forgotten to take a picture of the pot lined with corn husk when helping my mother prepare these)

(8) In pot put tamales

(9) Tuck in leaves to form a dome on the sides, Place a corn husk on the center (please note this dome is formed so water from the pots lid does not fall onto the tamales, if this happens they drown and never harden, you will get a mushy mess. (PLEASE NOTE WE RAN OUT OF CORN HUSK SO WE PUT A WET SQUEEZED TOWEL TO COVER IT)
(10) Have water boiling in a separate pot and put about 3 cups of boiling water in each pot, but ladle the water in through the sides of the dome, cover and cook on medium high heat, for about 1 1/2 hours.

(11) Take one out to test if the dough is raw or not fully cooked, when done they are ready to eat.

PLEASE NOTE:
I know I usually make this from scratch but I will repeat like I did in my other Tamale post:

"Here in the United States I feel safe to say NO ONE makes the dough from scratch, especially here in Southern Mexifornia I mean California we have so many good Mexican stores that sell quality Mexican ingredients, and prepare fresh dough daily, they sell by the pounds. The best dough down here in my opinion is from "La Amapola" a Mexican deli when we visit my aunt in Huntington Park we always stock up on Masa. But when we aren't in teh area and run out of their dough, then Vallarta (a chain of Mexican stores down here) and "El Gallo Giro" (a Mexican bakery) sell good masa.

The other option is to buy "Masa Harina" sold under the brand "Maseca" it is made of pure all natural corn, it is dried ground to a powder corn treated with lime to release the nutrients, the directions are on the packet for making the tamal dough, but I believe it's inferior to the fresh dough from the stores but still delicious."
In addition... if interested in the savory meat versions of tamales, check out my post for:

Tamales Mexicanos de Puerco en Chile Colorado y Pollo en Chile Verde (Mexican Red Pork Tamales and Green Chicken Tamales)

P.S.

There may be a way to make Pineapple Tamales from scratch with "Maseca" but I honestly don't know maybe follow the directions on the packet for the savory one's and replace broth with pineapple juice, replace lard with butter, and add sugar to taste, and some chopped pineapple? I don't know.